In this Tutorial we are discussing some basic concepts of Hybrid Mobile App and Develop First Ionic 2 Hybrid Mobile App, Let’s start developing simple ionic 2 Mobile Application having 2 screens. First screen will have a list, we will navigate to 2nd Screen using Navigation Controller and will pop back to first screen as well.
Ionic 2 Introduction
Ionic 2 is Html5 mobile app development Framework for hybrid Mobile apps. Hybird Mobile apps are actually small websites that are running in native App shell, through Cordova they can integrate with Mobile Device native feature.
Ionic 2 supports iOS 8 +, Android 4.4+, however support can be pushed back to Android 4.1 if Crosswalk is used with Cordova.
Operating system
For Android App OSX, Windows or Linux (any one Operating system can be used),
but when you want to build iOS app then you need OS X, if OSX not available then you can use PhoneGap Build or Telerik AppBuilder. which can compile and sign your apps in the cloud.
I am using OSX for developing this app.
Android Studio is required to test and deploy android app at emulator or real Device while by using Xcode we can build iOS App or can install app at iOS Devices or emulators.
Prerequisites
I assumed that Android studio and Xcode are already installed to test hybrid app on Mobile devices or simulators.
Further prerequisites for development of ionic 2 app are following .
- Install NodeJs
- Install cordova by writing following command at terminal
- npm install -g cordova
- install ionic 2 by writing following command at terminal
- npm install -g ionic@beta
Getting Started
Ionic 2 give us 3 templates by using them we can create an app with some predefined source code
- tabs(default)
- sidemenu
- blank
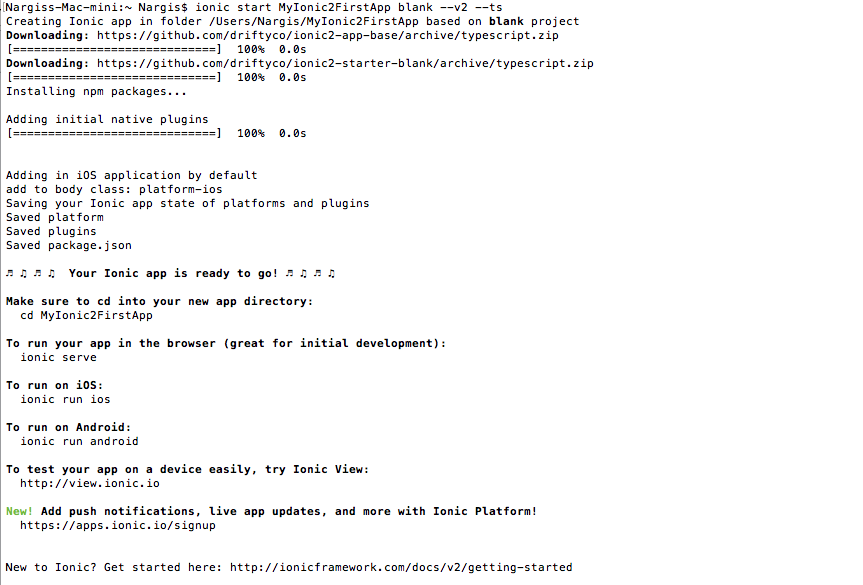
To create an application following command is to be used at terminal.
$ ionic start [projectName] [optional: starterTemplate] --v2 --ts
Here I am creating a simple blank application for which I m writing following command at terminal
$ ionic start MyIonic2FirstApp blank --v2 –ts
this will take some time to complete and will create “ios” project by default in “platforms” directory.
To add android project you need to navigate into your project directory
$ cd MyIonic2FirstApp
Then run following command
$ ionic platform add android
Now open your project in WebStorm or any other editor of your choice.
Project Directory Structure:
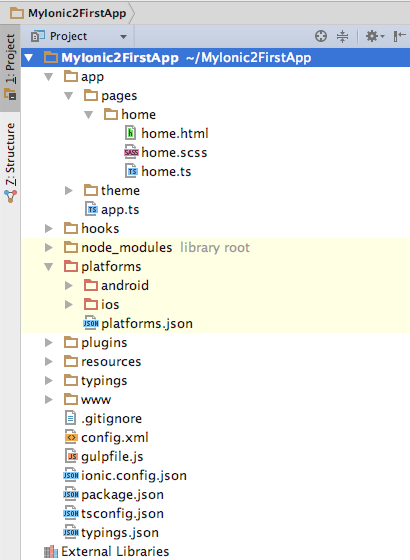
Let’s have a look at the files and folders that have been created in our project:
| app | This folder will contain all the code you’re going to write for the app, ie. the pages and services. |
| hooks | This folder contains scripts that can be executed as part of the Cordova build process. This is useful if you need to customize anything when you’re building the app packages. |
| node_modules | Ionic projects use npm to import modules, you’ll find all imported modules here. |
| resources | This folder contains the icon and splash images for the different mobile platforms. |
| typings | This folder contains type definition files for external modules that are not written in TypeScript. |
| www | This folder contains the index.html, remember all the app code should be in the app folder, not in the www folder. |
| config.xml | This file contains the configuration for Cordova to use when creating the app packages. |
| ionic.config.js | Configuration used by the Ionic CLI when excuting commands. |
| package.json | This file contains the list of all npm packages that have been installed for this project. |
| tsconfig.json | Configuration for the TypeScript compiler. |
| webpack.config.js | This file contains the configuration for WebPack, which will create a bundle from the modules in the app. |
| Platform | Contains your platform targets like iOS or Android. |
| www/index.html | This is obviously where you should update your meta tags and add in any required scripts (cordova, polyfills, vendor build, app build, etc.). |
| gulpfile.js | Here you find hooks for modifying the Ionic gulp tasks. Use these to modify the Ionic build. There are a number of custom hooks you can take advantage of. You most likely will not need to modify this file.
|
| app.js/app.ts | This is where we bootstrap our application and where you will find your app’s@App decorator. There are a handful of global settings you’ll want to pass in. Most importantly, you’ll want to pass your app’s root template, config and list of providers.
|
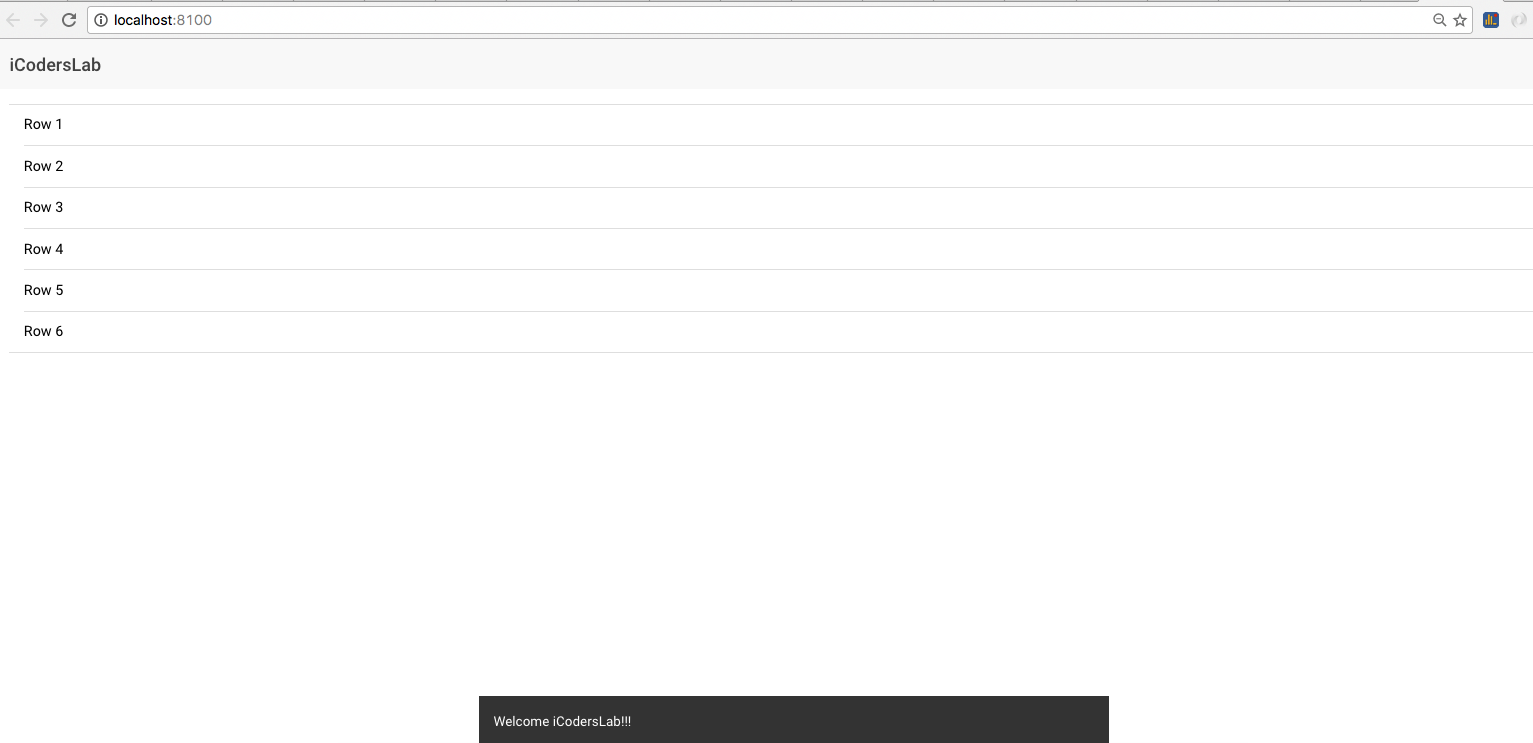
Now we are going to create a simple list by using <ion-list> having some static data.
In “home.ts” create an array of string and initialize it in constructor.
listdata:Array<string>;
constructor(private navController: NavController) {
this.listdata= [“Row 1″,”Row 2”, “Row 3″,”Row 4″,”Row 5″,”Row 6”];
}
Put below code in your “home.html”
<ion-navbar *navbar>

<ion-title>

iCodersLab

</ion-title>

</ion-navbar>
<ion-content class=”home” padding>
<ion-list>
<ion-item *ngFor=”let item of listdata” (click)=”itemSelected(item)”>
{{item}}
</ion-item>
</ion-list>
</ion-content>
In above code we just create a simple ion-list and using ngFor loop we display listdata in list rows, here a click event itemSelected(item) is also attached.
Add a welcome Toast in home.ts file, updated home.ts will look like this
import {Component} from "@angular/core";

import {NavController, Toast} from 'ionic-angular';

import {DetailPage} from '../detail/detail';
@Component({
templateUrl: ‘build/pages/home/home.html’
})
export class HomePage {
listdata:Array<string>;
constructor(private navController: NavController) {
this.listdata= [“Row 1″,”Row 2”, “Row 3″,”Row 4″,”Row 5″,”Row 6”];
this.showToast()
}
showToast() {
let toast = Toast.create({
message: ‘Welcome iCodersLab!!!’,
duration: 3000
});
this.navController.present(toast);
}
itemSelected(item){
console.log(“Clicked”);
}
}
Run Ionic 2 Application
To test and serve ionic 2 app at browser by starting a local development server, write below command at terminal.
$ ionic serve
To display Mobile app layout at the same time at browser below command is used
$ ionic serve --lab
Now before test this aap at iOS or android device we first add another Component that is detail screen which will be show when user click any row of the list.
To create a new component, write below at terminal of WebStorm
$ ionic g page detail
Above line will generate a directory named “detail” which contains 3 files
- html
- scss
- ts
Add below line in themes/core.scss
@import "../pages/detail/detail";
Now first import “DetailPage” into home.ts.
import {DetailPage} from '../detail/detail';
Now add below definition for click function “itemSelected”
itemSelected(item){

this.navController.push(DetailPage, {SELECTED_ITEM: item});

}
This is time to Move to DetailPage where we get SELECTED_ITEM from HomePage by using NavParams that is injected in to constructor.
Updated detail.ts will be look like this.
import { Component } from '@angular/core';

import { NavController, NavParams } from 'ionic-angular';
@Component({
templateUrl: ‘build/pages/detail/detail.html’,
})
export class DetailPage {
currentItem: string;
constructor(private nav: NavController, private navParams: NavParams) {
this.currentItem= navParams.get(‘SELECTED_ITEM’);
}
}
Add below html into detail.html
<ion-navbar *navbar>

<ion-title>Detail</ion-title>

</ion-navbar>
<ion-content padding class=”detail”>
<h2>{{currentItem}}</h2>
<p>This is Detail Screen of iCodersLab’s First Ionic 2 Application </p>
</ion-content>
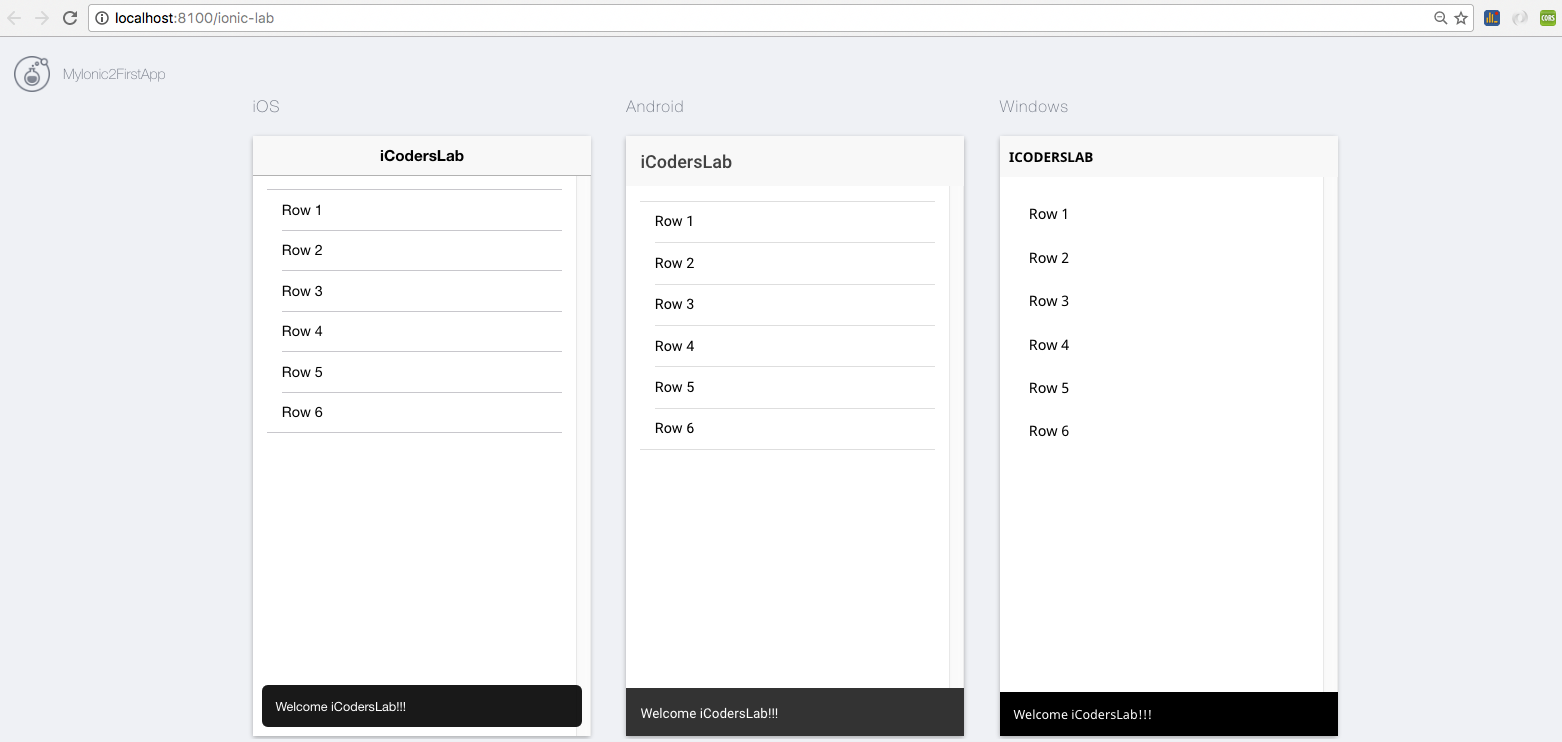
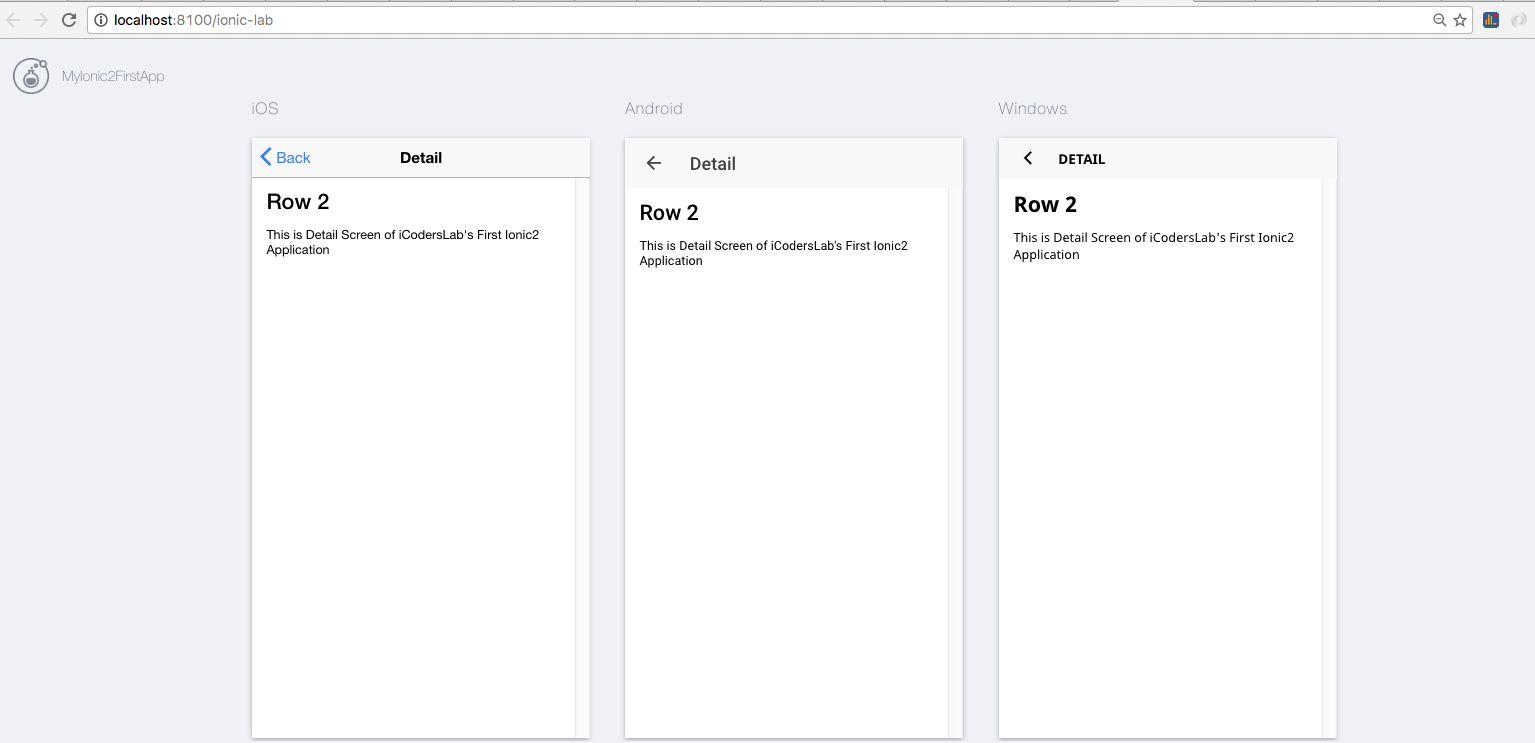
the Output of this app is look like this by writing below command at terminal.
$ ionic serve --lab
Screen #1
Screen #2
Run Ionic 2 App on Real device
In Next Tutorials we will learn;
How to run Ionic 2 app on iOS Devices / Simulators
How to run Ionic 2 App on Android Devices / Emulators
Leave a Reply