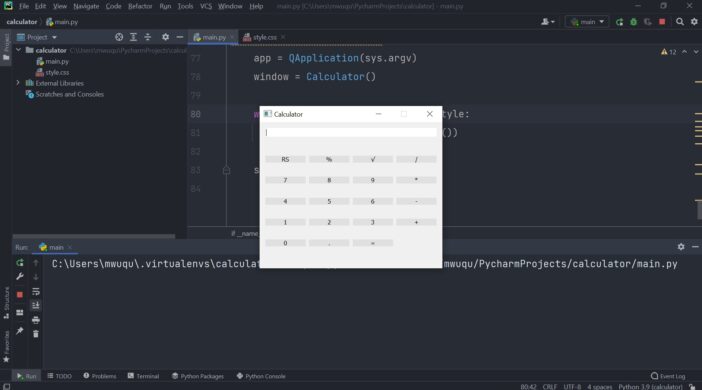
Did you want to make a calculator using Python? Well, then what are you waiting for. Let us get our hands dirty with some coding.
So today, we are going to be making a GUI calculator using Python. We will be using a Python library known as PyQt5 which helps create mind-blowing GUIs and interfaces such as calculators, web browsers, and other things.
First things, first. Let us import everything we need for the project. Just copy the code below:
import sys
import math
from PyQt5.QtWidgets import *
from PyQt5.QtGui import *
from PyQt5.QtCore import *
If you have not yet installed the needed packages then use the following command in the terminal:
pip3 install pyqt5
Now that you have imported the necessary items into our project, it’s time that we begin with the main calculator interface. Copy the following code into your project (this will be explained in the coming paragraph):
class Calculator(QWidget):
    def __init__(self):
        super().__init__()
        self.setWindowTitle("Calculator")
        self.setFixedSize(500,400)
        self.CreateApp()

    def CreateApp(self):

        #Creating our grid
        grid = QGridLayout()

        #result
        result = QLineEdit()

        buttons = ["RS", "%", "√", "/",
                    '7', '8', '9',"*",
                    '4', '5', '6', "-",
                    '1', '2', '3', "+",
                    '0', ".", "="]
        grid.addWidget(result, 0, 0, 1, 4)

        rows = 1
        cols = 0

        for button in buttons:
            if cols > 3:
                cols = 0
                rows += 1

            buttonObject = Button(button, result)
            if button == 0:
                grid.addWidget(buttonObject.b, rows, cols, 2, 2)
                cols += 1

            else:
                grid.addWidget(buttonObject.b, rows, cols, 2, 1)
            cols += 1

        self.setLayout(grid)
        self.show()
I added the code for the main interface within a class named ‘Calculator’ and passed it in QWidget. Then as-per-the-requirement, I initiated my function with __init__() and set the necessary setting for my interface such as the Window title, the window size and finally creating the app itself.
We basically lay down the foundation for our interface in the next function by creating buttons and arranging them into rows and columns. We also make a result line, where enter our sum and get its answer. Now, this code will not work as a stand-alone. We need further code because we haven’t yet told the program that our buttons are meant to be clicked on and be functional.
So for that bit of job you need this chunk of code. Note: this piece of code has to be placed on the top or else you’ll receive some issues.
class Button:
    def __init__(self, text, results):
        self.b = QPushButton(text)
        self.text = text
        self.results = results
        self.b.clicked.connect(lambda: self.HandleInput(self.text))

    def HandleInput(self,v):
        if v == "=":
            res = eval(self.results.text())
            self.results.setText(str(res))

        elif v == "RS":
            self.results.setText("")

        elif v == "√":
            value = float(self.results.text())
            self.results.setText(math.sqrt(value))

        else:
            current_value = self.results.text()
            new_value = current_value + str(v)
            self.results.setText(new_value)
In this class, we are going to set the functionality for our application. The first function is all about giving each element in our app a specific task to carry out.
For the second function, we use the Math library to perform mathematical calculations. The Math library is a whole bunch of mathematic operations that you can apply and use in your program.
To end today’s tutorial, you need one last piece of code and without this, your whole project will not work:
if __name__ == "__main__":
    app = QApplication(sys.argv)
    window = Calculator()

    with open("style.css", "r") as style:
        app.setStyleSheet(style.read())

    sys.exit(app.exec())
Now, this bit of code allows you to run your application and inform your system about it.
Optional
If you want your app to be a bit more appealing and stylish, what you need is a stylesheet, coded in CSS. Now, don’t worry if you don’t know CSS. Just create a new file in your editor and name it ‘style.css’. For the styling part, use the following code:
QPushButton {
     border: none;
     background: #e0e0e0;
}

QLineEdit {
     border: 5px #87cefa solid;
}
Note: You may have noticed that I have written a ‘with’ statement in the middle of the code (I have highlighted it as well) that tells the system what to do with the app. Now, if you aren’t using the stylesheet, then you’d better remove that chunk of line, or else you’ll receive some nasty bugs.
Want the whole code in one place and ready to go? Download it from Github


Leave a Reply